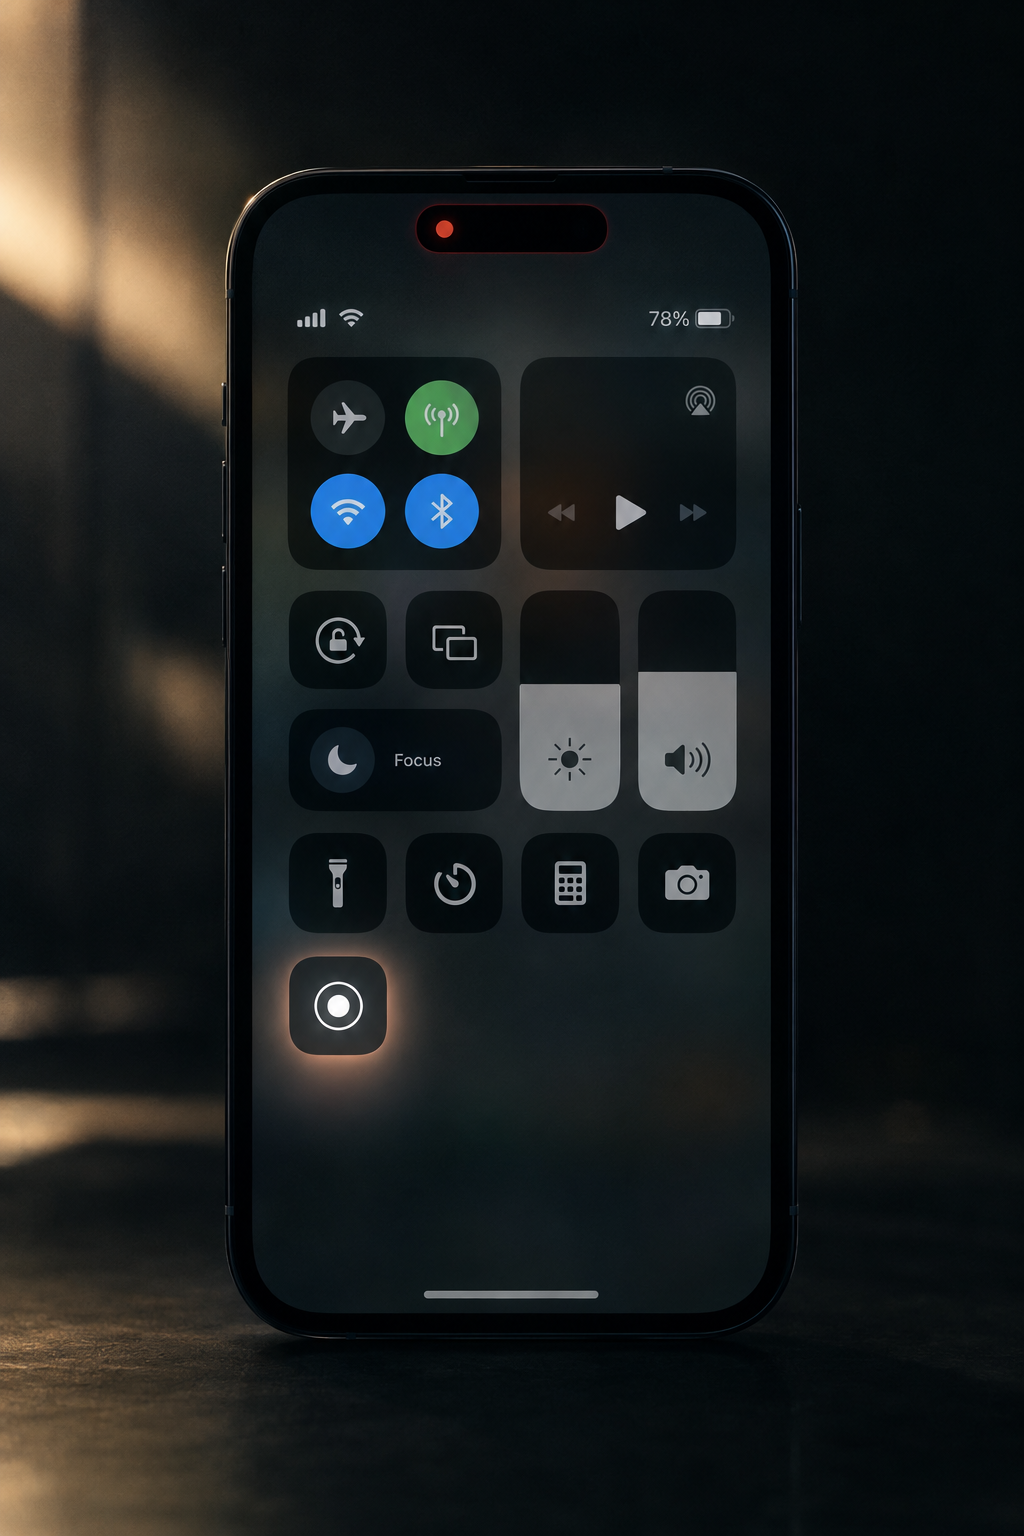
The fastest way to film your screen on iPhone is this: open Control Center, tap the Screen Recording button (a white dot inside a circle), wait for the three-second countdown, and tap the red indicator at the top of the display when you’re done. The video lands in the Photos app as a .MOV file. Everything else in this piece covers the details that trip people up: sound, black screens on Netflix, notifications popping into frame, and what to do when the button isn’t there at all.
Key Takeaways
- Screen recording has been built into every iPhone since iOS 11 in 2017. No app download needed.
- The button lives in Control Center. If you don’t see it, add it from Settings (iOS 17 and earlier) or the Add a Control menu (iOS 18 and later).
- By default you get on-screen video plus whatever audio the phone is playing. Touch and hold the record button to turn on the microphone for voiceover.
- Streaming apps like Netflix, Disney+, Prime Video and Apple TV record as a black rectangle. That’s DRM, not a bug.
- Phone and FaceTime call audio is never captured. Snapchat tells the other person when you record.
- For a clean capture with no red bar at the top, plug the iPhone into a Mac and record through QuickTime Player or iPhone Mirroring.
The Four-Tap Version
If you have done this before and just need the refresher, here it is in order.
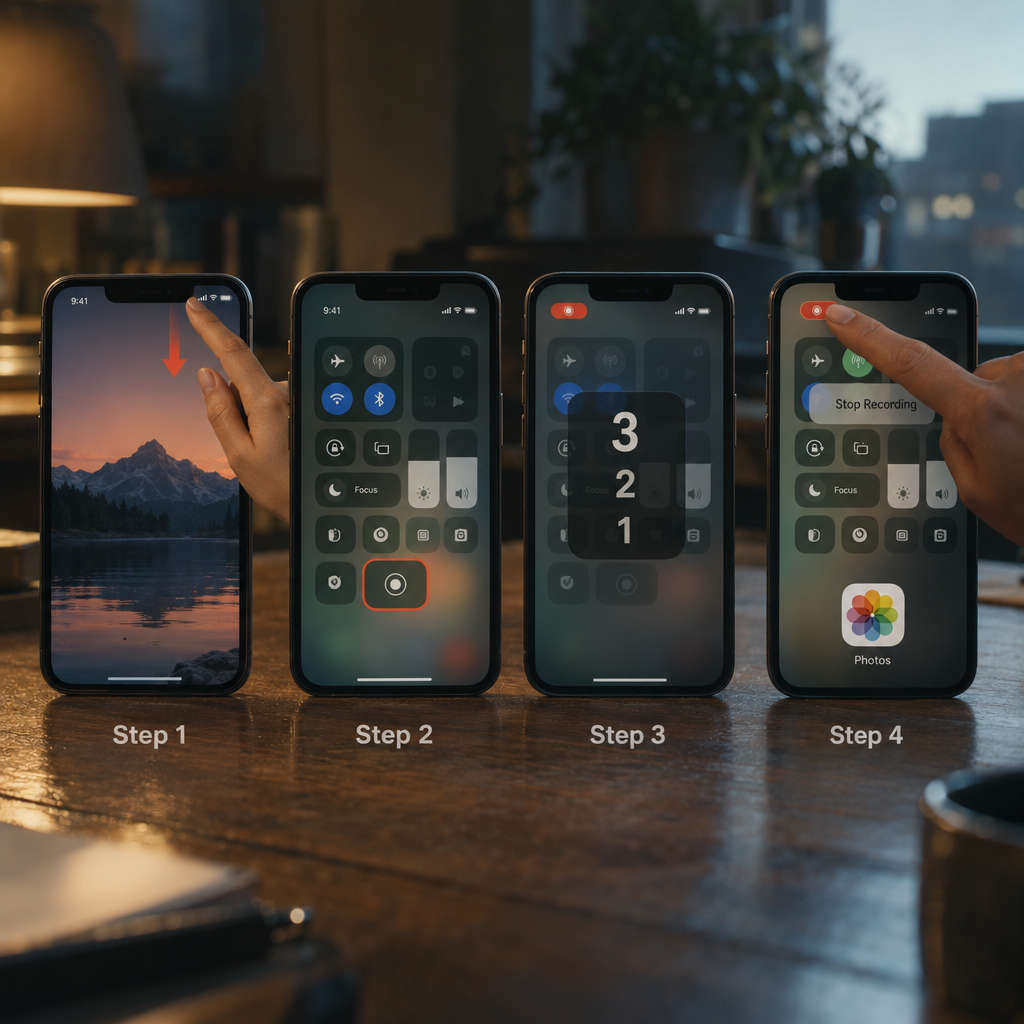
- Swipe down from the top-right corner of the screen (on an iPhone with a Home button, swipe up from the bottom edge).
- Tap the Screen Recording button. It looks like a solid dot inside a thin ring.
- Wait for the 3-2-1 countdown, then do whatever you want to capture.
- Tap the red clock or red pill at the top of the screen and confirm Stop. Open Photos to find the clip.
Total time from first swipe to saved video: about ten seconds plus however long you record. If step 2 fails because there’s no button, keep reading.
Before You Start: Put the Button in Control Center
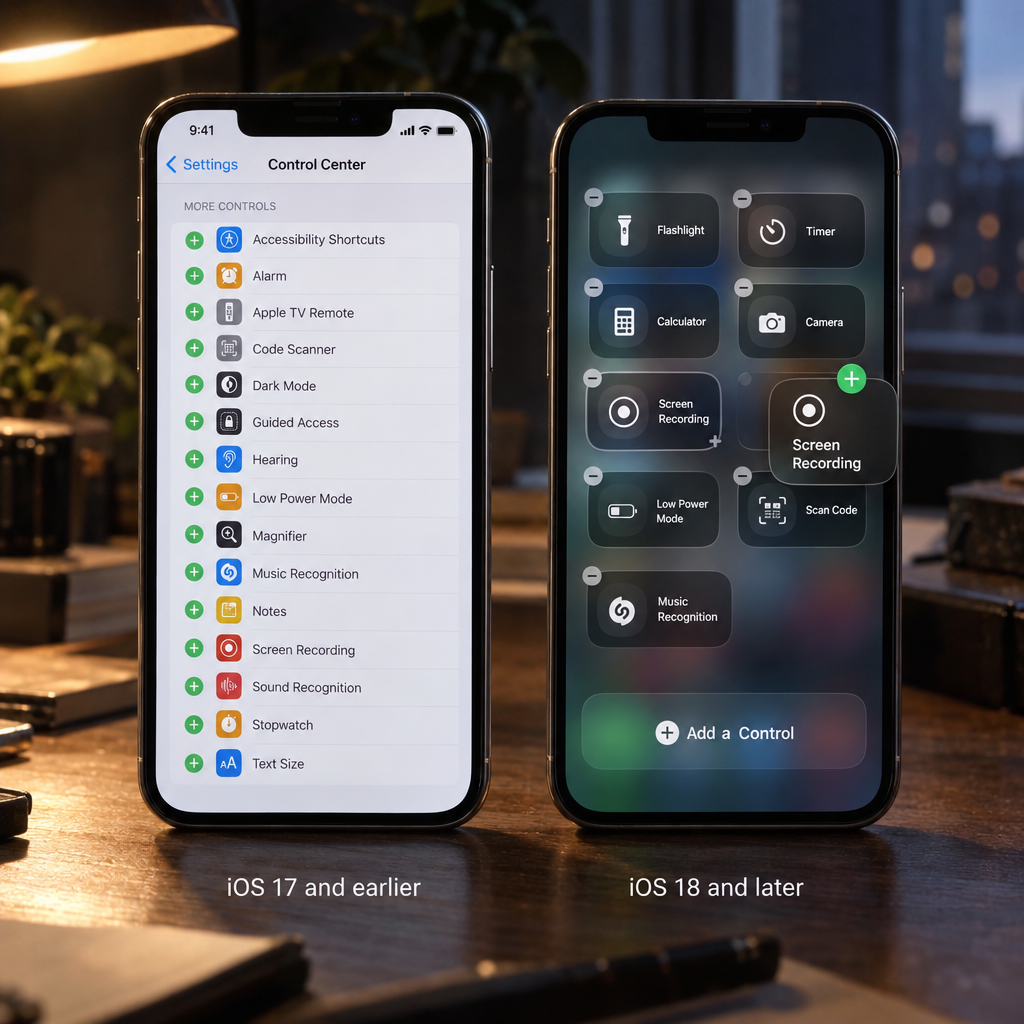
Apple ships Screen Recording as an optional control, and whether it appears by default depends on the phone and the iOS version it came with. Plenty of iPhones don’t show it until you add it manually. The process differs slightly between recent and older versions of iOS.
iOS 18 and iOS 26
Apple rebuilt Control Center in iOS 18, released in September 2024, and iOS 26 (which followed in September 2025, skipping the 19 through 25 numbers to match the year) keeps the same layout with a glassier look. Both let you add controls directly from Control Center itself.
- Open Control Center.
- Touch and hold an empty area of the panel, or tap the plus button in the top-left corner, to enter editing mode.
- Tap Add a Control at the bottom.
- Scroll or search for Screen Recording and tap it.
- Drag the new button wherever you want it, then tap outside the panel or swipe up to finish.
You can also resize the control. A larger tile is easier to hit in a hurry, which matters when you’re trying to catch something that only appears on screen for a moment.
iOS 17 and earlier
On older systems, Control Center customisation happens in Settings.
- Open Settings and tap Control Center.
- Scroll to the More Controls section.
- Tap the green plus next to Screen Recording.
The control moves up to the Included Controls list. Drag the three-line handle to reorder it if you want it near the top of Control Center. You can also toggle Access Within Apps here; leave it on, otherwise you won’t be able to open Control Center while the app you want to record is in the foreground.
The button is missing from both lists
If Screen Recording doesn’t appear in the Add a Control gallery or under More Controls, a Screen Time restriction is almost certainly blocking it. This is common on phones set up by parents, schools or employers, and also on phones where someone turned the restriction on years ago and forgot.
Go to Settings, then Screen Time, then Content & Privacy Restrictions, then Content Restrictions. Scroll down to the Game Center section and tap Screen Recording. Set it to Allow. The control reappears immediately. If the Screen Time passcode isn’t yours, you’ll need whoever manages the device to change it; a managed work phone may lock this permanently through a configuration profile.
Filming Your Screen, Step by Step
With the button in place, the actual recording process is quick. The details below matter more than they look, especially the first time.
Step 1: Open Control Center
On iPhone X and newer (every model with Face ID, including the iPhone 16 and 17 lines), swipe down from the top-right corner where the battery indicator sits. On the iPhone SE and any model with a physical Home button, swipe up from the bottom edge instead.
This works from the Home Screen, the Lock Screen, and inside most apps. A handful of full-screen games deliberately intercept edge swipes; in those you may need to swipe twice, once to reveal a small grabber tab and again to pull the panel down.
Step 2: Tap the record button and wait
Tap the Screen Recording control once. The icon turns into a 3, then 2, then 1, giving you time to dismiss Control Center and get the app into position. During the countdown nothing is captured, so you have a short grace period to swipe the panel away.
Once recording starts, the time in the status bar turns red. On models with the Dynamic Island, a small red recording pill appears there instead. Either way, that red marker is your stop button later.
Step 3: Do whatever you’re filming
Every tap, swipe, keyboard entry and app switch gets captured exactly as you see it. There’s no tap visualisation on iOS, so if you’re making a tutorial it helps to narrate what you’re pressing (more on microphone audio in the next section).
A few things to know mid-recording:
- Swiping between apps is fine. The recording continues across the Home Screen and into other apps.
- Opening Control Center or Notification Center during the recording gets captured too, including the moment you reach for the stop button.
- Pressing the side button to lock the phone ends the recording.
- Answering an incoming cellular call ends the recording as well.
Step 4: Stop and find the clip
Tap the red clock or red pill at the top of the screen. A dialog asks you to confirm. Tap Stop and a banner tells you the recording was saved to Photos. You can also stop from Control Center by tapping the record button again, which is now highlighted red.
Open Photos. The clip is in your Recents (called Library on iOS 18 and later, sorted at the bottom by date) and also in a dedicated Screen Recordings album under Media Types. The file name, visible if you AirDrop it or save it to Files, starts with RPReplay_Final followed by a number. It’s a .MOV (QuickTime) file at your display’s native resolution, encoded in HEVC (H.265) by default on modern iPhones or in H.264 if your Camera Formats setting is Most Compatible, which means it plays back on practically anything that handles QuickTime files.
Recording Audio: Phone Sound vs Your Voice
Audio is where most first-time recordings go wrong. People either end up with a silent video when they wanted narration, or they capture their whole living room when they only wanted the game’s soundtrack. iOS handles this with a single toggle that’s easy to miss.
Default behaviour: internal audio only
Out of the box, a screen recording captures video plus the audio the phone itself is playing. Game sound effects, a voice memo you’re playing back, the audio from a YouTube clip, the click of the keyboard if keyboard sounds are enabled. All of that comes through cleanly because it’s captured digitally, not through the mic.
Keep the media volume up. The volume level affects what’s recorded in some apps, and a phone turned all the way down can produce a silent clip. The Ring/Silent switch (or the Action Button set to silent mode on the iPhone 15 Pro and later) generally doesn’t block in-app audio in the recording, but some games respect the mute setting and go quiet, so check before recording something long.
Turning the microphone on for voiceover
Touch and hold the Screen Recording button in Control Center. A larger panel slides up with a Microphone button at the bottom. Tap it so it turns red and says Microphone On, then tap Start Recording.
Now you get both: the phone’s own audio and your voice mixed into a single track. This is the setting for walkthroughs, app reviews, bug reports where you’re explaining what went wrong, and reaction clips.
The microphone setting is sticky. If you turned it on for a tutorial yesterday, it’s still on today, and your quick capture of a funny text thread will include whatever your kitchen sounded like. Check the icon before each session.
One practical note: with the mic on, the phone’s speaker output and the microphone pickup can overlap. If the game is loud and you’re sitting close, you’ll hear a slightly doubled version of the game audio. Lower the speaker a little or wear headphones.
Headphones, AirPods and which mic gets used
Plug in wired headphones with an inline mic, or connect AirPods, and the recording’s microphone input follows whatever iOS considers the active audio input. With AirPods, that’s usually the AirPods’ own mics, which sit close to your mouth and reject background noise reasonably well. With a Lightning or USB-C wired headset, it’s the inline mic.
This is good news for narration. It’s less good if you’re in a windy spot with AirPods and wondering why the recording picks up every gust.
Audio output also matters. When headphones are connected, the game or app audio goes to the headphones, and iOS still captures it internally for the recording. You hear it privately, the recording gets it cleanly, and your mic only picks up your voice. For anyone making regular tutorials, this is the setup to use.
What never gets recorded
Call audio is off limits. A screen recording during a Phone call or FaceTime call will show the on-screen interface, but the other person’s voice (and yours, through the call) won’t be in the file. Apple treats call audio as protected, and third-party apps can’t get around it either.
This extends to most VoIP apps. WhatsApp and Signal voice calls follow the same rule. If you need a record of a call, the honest route is to ask the other party, then use the call-recording feature Apple introduced in iOS 18.1, which announces to everyone on the line that the call is being recorded and saves a transcript to Notes.
Making the Recording Look Clean
A raw screen recording includes everything: your notification banners, your low-battery warning, the name of the group chat that lit up halfway through. A couple of minutes of preparation saves a lot of editing.
Silence notifications with a Focus
Turn on Do Not Disturb (or any Focus mode) before you tap record. Open Control Center, tap the Focus button, choose Do Not Disturb. Banners stop appearing, calls go to voicemail, and the Dynamic Island stays quiet.
For regular recording sessions it’s worth creating a dedicated Focus. Go to Settings, Focus, tap the plus button, and build one called Recording that silences every app and hides notification badges. You can even set it to switch on automatically when you open a specific app, such as the game you stream.
Landscape or portrait
The recording follows the orientation of the content, not the orientation you were holding the phone when you tapped the button. A landscape game produces a landscape video; a portrait app produces a portrait one. If you rotate mid-recording, the file keeps the original orientation and the rotated content appears sideways inside it.
Lock the orientation if the app supports both. The Portrait Orientation Lock button in Control Center prevents an accidental tilt from flipping your tutorial.
Hide anything you don’t want to share
Screen recordings are evidence. Before you start, think about what’s visible:
- Your name and photo at the top of the Settings app.
- Email subject lines and message previews in Notification Center.
- Saved passwords, which iOS shows as dots but which autofill can reveal.
- Your home address in Maps or Weather.
- Two-factor codes that arrive via SMS during the recording.
Close those apps or scroll past the sensitive bits before tapping record. It’s much easier than blurring them in an editor later, and blurring on iPhone is clumsy without a third-party app.
Lock down accidental taps with Guided Access
Guided Access (Settings, Accessibility, Guided Access) locks the phone into a single app and can disable touch in chosen areas of the screen. It’s designed for kids and kiosks, but it’s also handy when you’re recording a demo and want to make sure a stray thumb doesn’t launch Control Center or swipe to the Home Screen.
Set it up, triple-click the side button in the app you want to record, start Guided Access, then start the screen recording. You’ll need to stop the recording from Control Center afterwards if the red bar is hidden, which is another reason to add a dedicated control.
Assign it to the Action Button
On iPhone 15 Pro, iPhone 16 and iPhone 17 models with the Action Button, iOS 18 and later let the button trigger any item from the Controls gallery, and Screen Recording is one of them. Open Settings, tap Action Button, swipe to Controls, and pick Screen Recording. One press starts the countdown, and you skip Control Center entirely. For gamers who record a lot, this is the single biggest convenience upgrade.
Can Siri start a screen recording?
No. Asking Siri to “record my screen” produces a web search, not a recording, and Apple hasn’t exposed a Shortcuts action for it either. The Action Button, the Back Tap gesture (Settings, Accessibility, Touch, Back Tap, which can’t trigger screen recording directly but can open Control Center) and the Control Center button remain the only ways in.
What You Can’t Film: Streaming Apps and the Black Screen
The question that sends more people searching than any other: why does my recording of Netflix come out black?
DRM protected video
Streaming services use FairPlay, Apple’s digital rights management system, to encrypt their video. When FairPlay content is playing, iOS blanks that portion of the screen in any screen recording or screenshot. You’ll see the player controls, the progress bar, maybe the subtitles, but the picture itself is a black rectangle. Audio is usually blanked too.
This applies to Netflix, Disney+, Prime Video, Max, Paramount+, Hulu, Peacock, Apple TV and most other paid services. It applies to rented and purchased films in the Apple TV app as well. Try to capture the opening of Danny Boyle’s 28 Years Later or an episode of Severance and you’ll get a dark frame every time.
There is no setting to override this. It’s enforced at the system level, and third-party recorder apps hit the same wall. Mirroring the phone to a Mac with iPhone Mirroring doesn’t help either; the Mac shows the same black box. The HDMI route is also blocked: Apple’s Lightning Digital AV Adapter and USB-C Digital AV Multiport Adapter enforce HDCP, the copy-protection standard, so a capture card downstream records nothing useful.
If you want a clip from a film for commentary or criticism, the practical options are a trailer (which services publish without DRM on YouTube) or a licensed clip from the studio’s press site.
What still records fine
YouTube, TikTok, Instagram Reels, Twitch streams in the Twitch app, Vimeo, and most news-site video players use standard playback without FairPlay. These record normally. So does any video in your own Photos library, screen-shared content in a video call, and games.
Apps that notify the other person
Recording someone else’s content raises a social question, and some apps answer it on your behalf.
Snapchat notifies the sender when you screen record a snap, a story or a chat, just as it does for screenshots. This has been true since the early days of the platform and it’s thorough. BeReal flags screenshots and screen recordings of posts to the person who posted them. Instagram does not notify for feed posts, Reels or stories, but it does alert the sender if you capture a view-once photo or video in direct messages. WhatsApp blocks screenshots of view-once media outright and shows a black frame if you try.
iMessage, FaceTime, TikTok, X and YouTube send no notification. None of this is a license to record people without their knowledge; it’s just the technical reality.
Recording Longer: Battery, Storage and File Sizes
Screen recording is cheap on resources compared to filming with the camera, but it isn’t free, and a long session can surprise you.
How big the files get
File size depends on your phone’s screen resolution, how much the picture changes, and how long you record. A static tutorial where you tap through menus compresses well. A fast-moving game at 60 frames per second generates far more data per second.
As a rough working figure, expect a few hundred megabytes for a ten-minute gaming session on a recent Pro model, and considerably less for a slower-paced app walkthrough. Check your own numbers: open the clip in Photos, swipe up (or tap the info button) to see the file size alongside the resolution and frame rate. After one or two recordings you’ll know what to expect from your particular phone.
The thing to avoid is running out of space mid-recording. If storage is full, iOS throws a “Screen Recording failed to save” error and the clip is lost. Check Settings, General, iPhone Storage before a long session and keep at least a couple of gigabytes free.
Battery and heat
An hour of screen recording of a demanding game will warm the phone and drain the battery noticeably, because you’re rendering the game and encoding video at the same time. Plug in if you can. If the phone gets hot enough to throttle, the game’s frame rate drops and the recording stutters with it.
There’s no hard time limit on recordings. People have captured multi-hour sessions. The limiting factors are storage and the fact that iOS stops the recording if the phone locks, so set Auto-Lock to Never (Settings, Display & Brightness, Auto-Lock) for anything lengthy, then set it back afterwards.
Low Power Mode
Low Power Mode reduces the display refresh rate on ProMotion models and dials back performance. Recordings still work, but a game that normally runs at 120Hz will be captured at 60Hz or lower, and the picture may look choppier than you’d expect. Turn Low Power Mode off before recording if smooth motion matters.
The Mac Route: QuickTime and iPhone Mirroring
Two methods bypass the on-device recorder entirely. Both need a Mac and both produce a cleaner result: no red status bar, no countdown, and a file that lands straight on the computer where you’ll edit it.
QuickTime Player with a cable
This has worked since OS X Yosemite and iOS 8 in 2014, and it still works today.
- Connect the iPhone to the Mac with a USB-C cable (or Lightning to USB-C or USB-A for older phones). Use a data cable, not a charge-only one.
- Unlock the phone. If prompted, tap Trust This Computer and enter your passcode.
- Open QuickTime Player on the Mac. Choose File, then New Movie Recording.
- Click the small arrow next to the red record button. Under Camera, choose your iPhone. Under Microphone, choose your iPhone too if you want the phone’s audio, or the Mac’s microphone for narration.
- Click record. Everything on the phone’s screen appears in the QuickTime window and is captured.
- Click stop, then save the file.
The capture uses a clean feed from the phone, so the status bar shows a full battery and a neutral time (Apple’s marketing default of 9:41) rather than your real clock, which is a nice touch for product demos. The phone’s screen must stay on, and the Mac handles encoding so the phone doesn’t heat up.
iPhone Mirroring on macOS Sequoia and later
Apple introduced iPhone Mirroring in macOS Sequoia alongside iOS 18. It lets you see and control your iPhone from a window on the Mac, wirelessly, while the phone stays locked in your pocket. It wasn’t available in the European Union at launch for regulatory reasons, and that restriction was still in place well into 2025, so EU readers should stick with QuickTime.
To record with it:
- Open iPhone Mirroring from the Dock or Applications folder and authenticate.
- Press Shift-Command-5 to open the Mac’s screenshot toolbar.
- Choose Record Selected Portion, drag the capture area around the iPhone window, and click Record.
- Click the stop button in the menu bar when you’re done. The file saves to the desktop by default.
This method captures audio only if you pick a source in the Options menu of the screenshot toolbar, and the phone’s audio plays through the Mac during mirroring, so choose the Mac’s audio where available or use a tool like Loopback or BlackHole to route it. Video quality is slightly softer than the QuickTime cable method because the stream is wireless, but for most tutorials it’s indistinguishable.
Which Mac method to pick
Use the cable and QuickTime when you want maximum sharpness and reliable audio. Use iPhone Mirroring when you want to control the phone from the Mac keyboard and trackpad while recording, which is excellent for narrated walkthroughs where your hands are busy.
Trimming, Cropping and Editing the Result
The raw file almost always needs a trim at both ends, since it includes you reaching for the stop button. Photos handles the basics without any extra app.
Trim in Photos
- Open the recording in Photos and tap Edit.
- Drag the yellow handles at either end of the timeline to set the new start and end points.
- Tap Done. On iOS 16 and later, you’ll be asked whether to Save Video (overwriting the original, though you can revert later) or Save Video as New Clip.
Trimming in Photos is non-destructive on the original if you choose the overwrite option; you can always open Edit again and tap Revert.
Crop out the status bar
Still in Edit mode, tap the Crop icon and drag the top edge of the frame down to remove the red recording indicator and the clock. This also removes the Dynamic Island area. The resulting video is slightly shorter in aspect ratio, which is rarely a problem for social media or a support ticket.
You can also apply Photos’ filters and adjustments, though for a screen recording there’s seldom a reason to.
More serious editing
For voiceover added after the fact, zoom-ins on a particular button, text callouts or stitching several clips together, move to a proper editor:
- iMovie, free from the App Store, handles cuts, titles, voiceover and simple transitions. It exports at the original resolution.
- CapCut, free with optional subscription, is popular for TikTok-style edits and includes auto-captions, which are useful for tutorials.
- LumaFusion, paid, is the closest thing to a desktop editor on iPhone and iPad, with multi-track timelines and precise keyframing for zoom effects.
If you recorded through a Mac, the file is already there for Final Cut Pro, DaVinci Resolve or iMovie on the desktop.
Turning a recording into a GIF
Short screen recordings often work better as GIFs for bug reports or chat replies. The Shortcuts app includes a Make GIF action; build a one-step shortcut that accepts a video and converts it, then run it from the Share sheet. Giphy’s app also converts videos, though it adds its own branding by default.
Sharing and Exporting
Once the clip is trimmed, the Share sheet handles distribution.
AirDrop to a Mac or another iPhone keeps the original quality. Messages compresses the video somewhat unless you choose to send it at full quality (which iMessage does when the file is small enough). WhatsApp compresses heavily; send it as a document rather than a video to preserve resolution. Email attachments are limited to a few tens of megabytes on most providers, so Mail Drop or a cloud link is better for anything long.
Saving to Files is useful for keeping screen recordings out of your Photos library. Tap Share, choose Save to Files, pick a folder in iCloud Drive. The clip is then available on your Mac through Finder.
To upload directly to YouTube, Google Drive, Dropbox or Slack, each app appears in the Share sheet once installed. Many offer a Save to or Upload option without opening the app’s main interface.
Submitting bug reports to Apple and developers
Screen recordings are the single most useful thing you can attach to a bug report. Apple’s Feedback Assistant app, installed automatically on devices enrolled in the beta software program, accepts video attachments directly, and the app’s own instructions ask for a screen recording whenever a problem is visual.
Developers feel the same. A ten-second recording of the crash or the misaligned button answers a dozen back-and-forth emails. Include the iOS version (Settings, General, About) and the app version in the same message, and note whether the mic was on so they know any narration is intentional.
Broadcasting Instead of Recording
The long-press panel in Control Center does more than toggle the microphone. Scroll its list and you’ll see any installed app that supports live screen broadcasting through Apple’s ReplayKit framework. Instead of saving a file, the screen gets streamed straight into that app.
Twitch’s app supported ReplayKit broadcasting for mobile gamers, and Discord’s mobile screen share works through a similar mechanism, letting you show your iPhone screen to a voice channel. Zoom, Microsoft Teams, Google Meet and FaceTime all offer in-app screen sharing during a call; in Zoom you tap Share, choose Screen, and iOS switches you to the broadcast interface.
A few things to know about broadcasting:
- The red indicator appears exactly as it does for a local recording.
- DRM content still shows black to everyone watching.
- You can run a local recording and a broadcast at the same time if the app allows it, but the phone works harder and the battery drains faster.
- Stopping the broadcast is done through the red indicator or inside the app, not through the Photos app, since no file is being created.
For streaming games professionally, most people route the phone through a Mac or capture card anyway, because that gives them overlays, chat and scene switching that mobile broadcasting lacks.
Third-Party Screen Recorder Apps: When They’re Worth It
The App Store is full of screen recorder apps, and most of them are thin wrappers around the same ReplayKit feature the built-in recorder uses. They can’t record DRM content, can’t capture call audio, and can’t hide the red bar. What they can do is layer extras on top.
Record It! by DigitalWorkroom is one of the longer-standing options. It adds a face-cam overlay recorded after the fact, trimming, and commentary tools. Several similar apps offer the same bundle. The use case is a creator who wants to record a game, then add a reaction window and annotations without opening a desktop editor.
Be sceptical of any app that claims to record Netflix, hide the recording indicator, or capture FaceTime audio. It can’t, and the reviews will say so.
For most people, the built-in recorder plus iMovie or CapCut covers everything. Install a third-party recorder only if there’s a specific feature, like a picture-in-picture face cam, that you’ll use often enough to justify the subscription most of them charge.
Troubleshooting: Fixes for the Usual Problems
“Screen Recording failed to save”
Storage is the usual cause. Free up space and try again. If storage isn’t the issue, restart the phone; the recording service occasionally hangs and a reboot clears it. On rare occasions a specific app blocks recording of its own screen for security reasons (banking apps do this), in which case you’ll see a black frame rather than an error.
No sound in the recording
Three possibilities. The media volume was down. The app respected the mute switch and went silent. Or you expected narration but the microphone toggle was off. Check each in that order.
Only system sound, no voice
The microphone toggle is off. Touch and hold the Screen Recording control and turn Microphone On before starting.
Recording stops on its own
The phone locked, a call came in, or the phone overheated and iOS stopped the encoder. Set Auto-Lock to Never for long sessions, enable Do Not Disturb, and keep the phone cool.
The video is black
The content is DRM protected. There’s no fix; see the streaming section above.
Control Center won’t open in a game
Some games block the edge swipe. Swipe once to reveal the grabber tab, then swipe again. Alternatively, use the Action Button shortcut or an AssistiveTouch floating button (Settings, Accessibility, Touch, AssistiveTouch) with Control Center assigned to it.
The recording is choppy
The phone was throttling from heat, Low Power Mode was on, or the game itself was dropping frames. Cool the phone, disable Low Power Mode, and lower the game’s graphics settings if it has them.
The red indicator covers something important
Crop it out in Photos afterwards, or record through a Mac with QuickTime, which doesn’t show the indicator at all.
Why People Film Their iPhone Screens
The feature exists for support tickets and tutorials, but the ways people actually use it say something about how phones fit into daily life.
Tutorials and app walkthroughs are the obvious one. Every how-to channel on YouTube and TikTok is built on screen recordings, narrated with the microphone on and trimmed in CapCut.
Gaming clips come second. Mobile games from Genshin Impact to Marvel Snap generate enormous volumes of shared footage, almost all of it captured with the built-in recorder and posted within minutes.
Then there’s documentation. Journalists and researchers routinely screen record social media posts before they’re deleted, because a screenshot can be dismissed as doctored while a video of scrolling through a live profile is harder to dispute. Tenants record glitching rental apps. Customers record a checkout page showing one price and a confirmation showing another. Parents record what a game shows their kid. A thirty-second recording with the timestamp visible in the status bar is a surprisingly robust piece of evidence.
Saving memories is the quieter use. A voice note from a grandparent played back in Messages, a FaceTime call where the other person’s face is visible even if their voice isn’t captured, a group chat that’s about to be left. People film their screens to hold on to things that only exist on them.
A note on consent and the law
Recording what’s on your own screen is your business. Recording other people, or content they created, is where it gets complicated.
In the United States, call-recording law varies by state. Federal law and most states require one-party consent, meaning you can record a conversation you’re part of. California, Florida, Washington, Illinois and several others require all parties to agree. Screen recording a video call where the other person appears on screen can fall under the same rules, even though iOS doesn’t capture the call audio. Apple’s own iOS 18.1 call recording feature plays an announcement to everyone on the line for exactly this reason.
Copyright is separate. Recording a YouTube video or a TikTok and reposting it as your own is infringement regardless of what the app allows. Recording for private reference, criticism or commentary is far more defensible, but “the app let me” is never the test.
From Tangerine to 28 Years Later: When the iPhone Screen Became the Film
Filming your screen and filming with your phone are different things, but they’ve converged in one odd corner of cinema. Over the past decade a run of films has been shot on iPhones, and a parallel run has been set entirely on screens.
Sean Baker shot Tangerine in 2015 on three iPhone 5s handsets fitted with Moondog Labs anamorphic adapters, using the FiLMiC Pro app to control exposure and focus. It premiered at Sundance and was distributed by Magnolia Pictures, and it’s still the film people point to when someone says a phone can’t produce cinema. Steven Soderbergh followed with Unsane in 2018, shot on an iPhone 7 Plus, and High Flying Bird in 2019, shot on an iPhone 8 and released by Netflix, where it remains available to stream. Danny Boyle went further in 2025 with 28 Years Later, shot largely on iPhone 15 Pro Max units in custom rigs and released theatrically by Sony Pictures in June of that year.
The screenlife genre is the stranger cousin. These films unfold entirely on computer and phone displays: Unfriended (2014, Universal and Blumhouse) staged a horror story in a Skype call. Searching (2018, Screen Gems), directed by Aneesh Chaganty with John Cho, told a missing-person mystery through browser windows, FaceTime calls and iMessage threads, and its 2023 follow-up Missing, directed by Will Merrick and Nick Johnson with Chaganty producing, did the same with Nia Long. Host (2020) was shot during lockdown over Zoom in under a week and became a Shudder original, where it still streams. Producer Timur Bekmambetov’s company Bazelevs made screenlife a house style, with Profile (2018) building an entire thriller from a journalist’s laptop desktop.
Those films are, in the most literal sense, screen recordings with a script. Watch Searching with the knowledge of how Control Center works and you start to notice the craft in making a desktop feel like a stage.
For anyone making their own screen-based short, the built-in iPhone recorder is a rough tool: the red bar, the countdown, the inability to capture a FaceTime voice. Filmmakers get around it the same way this article suggests. Capture through a Mac, record the audio separately, and edit it together. Chaganty’s team built Searching’s interface mostly in post-production; they didn’t tap record and hope.
iPad and Apple Watch Notes
The iPad recorder is identical to the iPhone’s. Control Center opens with a swipe from the top-right corner on every current model, the Screen Recording button is added the same way, and the long-press panel offers the same microphone toggle. Stage Manager on iPad Pro and iPad Air adds one wrinkle: the recording captures the whole display, including the strip of recent apps on the left, so hide it (or go full-screen in the app) before recording.
Apple Watch has no screen recording feature, on any model including the Ultra line. You can take a screenshot by pressing the Digital Crown and side button together (after enabling it in the Watch app under General, Screenshots), but there’s no way to capture video of the watch display natively. The workaround is to film the physical watch with an iPhone camera, which is what Apple’s own product videos and most reviewers do.
FAQ
How do I film my screen on iPhone with sound?
Touch and hold the Screen Recording button in Control Center instead of tapping it once. Tap Microphone so it turns red, then tap Start Recording. The clip will contain both the phone’s own audio and your voice. If you only want the app’s sound, leave the microphone off; it’s captured internally by default.
Why is my screen recording black when I record Netflix or Disney+?
The video is protected by FairPlay DRM, and iOS blanks protected content in every recording and screenshot. This applies to Netflix, Disney+, Prime Video, Max, Apple TV, Hulu and similar services. There’s no setting to change it and third-party apps can’t bypass it. YouTube, TikTok and Instagram record normally because they don’t use that protection.
Does the other person know if I screen record on iPhone?
iOS itself never tells anyone. Some apps do. Snapchat notifies the sender when you record a snap, story or chat. BeReal flags screen recordings of posts. Instagram alerts the sender only for view-once media in direct messages. iMessage, FaceTime, TikTok, X and YouTube send no notification.
Can I record a FaceTime call with audio?
Not through screen recording. The video of the call is captured but the call audio from both sides is excluded for privacy reasons. For a cellular call, the call recording feature introduced in iOS 18.1 (tap the record button in the top-left of the call screen) records with an announcement to all parties and saves a transcript in Notes. FaceTime has no equivalent, so you’d need to record the audio with a separate device and the other person’s agreement.
How do I get rid of the red bar at the top of the recording?
Crop it out in Photos: open the clip, tap Edit, choose the Crop tool and drag the top edge down. Or avoid it entirely by recording through a Mac. Connect the phone with a cable, open QuickTime Player, choose File, New Movie Recording, and select the iPhone as the camera. That capture shows a clean status bar with no recording indicator.
Is there a time limit on iPhone screen recordings?
No fixed limit. Recording continues until you stop it, the phone locks, a phone call comes in, storage fills up, or the phone overheats. For long sessions, plug in, set Auto-Lock to Never, enable Do Not Disturb, and make sure there are at least a couple of gigabytes of free space before you start.